Contents
1. Why
Assembling a PC from standard components is not something that I normally do, at least not for my main computer. In fact, all my serious computers were vertically integrated, hardware and operating system from the same vendor. After my NeXT Station, with the appearance of Mac OS X Developer Preview 2, I switched to Apple towers, and over the years I had a Power Mac 9600, G3, Dual G4, and Dual G5.
As my G5 was becoming a bit underpowered, understandable after over 4 years, and knowing that Snow Leopard was not going to support PowerPC processors I starting thinking about buying a replacement. The Apple towers have never been cheap but, unfortunately, with the introduction of the new i7-based models earlier this year Apple has pretty much scrapped the entry level Mac Pro, leaving the current Mac Pros truly in the realm of professional use, both from a feature set and from a price perspective.
What I wanted was a desktop computer with a good graphics card and upgradeable memory and hard-drives. For a while I toyed with the idea of getting an iMac but it felt wasteful not to use the gorgeous cinema display I still have. Also, my experience with trying to get the hard-drive in our home theatre Mac Mini replaced at the Apple Store, for an insane amount of money, made me think twice about buying an all-in-one Apple computer. This left me with no options; that is, no options from Apple.
Fellow Mull Nat! had started using an EFI-X based Hackintosh a while ago but I never liked the idea of relying on special hardware hacks or modified kernels. This all changed with the advent of approaches like Boot-123 and Chameleon, which allow the installation of a vanilla retail OS X on standard PC hardware.
To be honest, I don't feel good about doing this. I would like to spend my money with Apple because I think they have a fantastic operating system and great hardware. As you'll see further down I've spent about A$1,300 on my Hackintosh. The components are not cheap choices, in fact they are pretty decent, but still, I would have had no problem paying A$2,000 for a comparable computer from Apple; maybe I would have expected FireWire 800 and integrated Bluetooth. What I was not prepared to do was to spend in excess of A$5,000 for a computer with features I really didn't need.

2. The hardware
My goal was to build a mid-range Hackintosh, not to compete with a Mac Pro. This means desktop CPU, which in turn means a single CPU system, normal DDR2 RAM, etc. Also, when you look at the prices it's very possible that you feel you can buy the same part for less. This is entirely possible but things can be more expensive in Australia and I opted to buy all parts from a single vendor that I trust.
Item            Qty Description                                        Amount
_____________________________________________________________________________

B-EP45-UD3LR      1 Gigabyte GA-EP45-UD3LR, S775,P45,FSB1600,4DDR2,    $153.01
                    PCIE2.0,GbLAN,RAID,UD3,ATX,SATA2
Many Hackintosh guides, including the one I followed, use the GA-EP45-DS3L but that wasn't readily available here. As far as I can tell this board is just a slight variant, probably with improved production quality. (The “UD” stands for ultra durable.) Either way, this board should be quite compatible with OS X, it's popular in general, it won several awards, and it's not hugely expensive.
A-E8400           1 Intel CORE 2 DUO E8400/3.00GHz/6MB CACHE/1333FSB/  $211.52
                    LGA775/45NM
I considered the quad-core but affordable ones have only 2.6GHz, and with the current state of parallelism in key applications I felt that the higher clock-speed was preferable.
R-CNPS9700LED     1 Zalman CNPS9700LED (Copper) CPU Cooler, 2-Ball     $72.42
                    bearing, Multi Socket, Ultra Quiet 110mm Fan
An article series on Tom's hardware convinced me not to go with the box cooler and gave this one a glowing review. Pun intended, the cooler is actually glowing; it has a blue LED. In hindsight, I should have gone with the CNPS9900LED because that one has support for PWM speed control.
C-TWIN2X4096-8500C1 Corsair TWIN2X4096-8500C5D 4GB (2x XMS2 2GB) PC-   $118.62
                    8500 (1066MHz) DDR2 RAM, 2x240-pin DIMMs, Non E
I've had good experience with Corsair, and these are listed in the compatibility list of the board. Might get another pair if 4GB turn out to be too little. Then again, my work MacBook Pro is fine with 4GB.
D-GV-N98TGR-512I  1 Gigabyte GF9800GT PCI-E 512MB, 256 Bit DDR3, 550/  $139.00
                    1800MHz, 1x Dual-Link DVI, HDMI, VGA, Fan
This was a tricky decision. The 9800GT is on of the more compatible chipsets, given that it's based on the same NVIDIA G92 technology that the 8800GT was built on, and that was an option on some Mac Pros. It should still be plenty fast. The card made by XFX is more popular, maybe because it has two DVI connectors, but the XFX card has a reputation for being loud. So, I opted for this one, also in the hope that a Gigabyte card on a Gigabyte board would work well.
G-RC-500-KKN1     1 CoolerMaster Mid ATX Case,  Sileo 500, Sound-proof $102.00
                    design, No PSU
Good reviews. Should be relatively silent.
G-EPR525AWT       1 525 watt ATX power supply Enermax, PRO82+ 525W     $119.00
                    CrossFireX™, EPR525AWT
Good reviews. Should be enough power for a higher end graphics card; it does support CrossFire after all.
L-DVR-218BK       1 Pioneer DVD Burner, DVR-218BK, SATA Interface,     $54.00
                    Black, 12x/22x Dual/Single OEM, w/Software
Indications are this all works better with an optical SATA drive. Pioneer have a reputation of being reliable and they apparently can be made region free without too much hassle.
E-ST3500418AS     2 Seagate Barracuda,  500GB, 16MB, 7200RPM, SATA2,   $149.50
                    7200.12, ST3500418AS
Having two drives makes dual-booting easier. (More on that later.) Plus, terabyte drives have more platters and get warmer, which would make the fans spin faster, and the whole system more noisy.
Maybe, as my brother pointed out, it was a bad idea to order two drives that are exactly the same because if there is a problem with that batch both, the main and the backup drive, are likely to fail together. Luckily, in the end the two drives I actually got are slightly different revisions of this model.
By the way, this list is copy/pasted from my order at Eyo. I've used Newegg extensively for research; they have a lot of useful customer reviews.
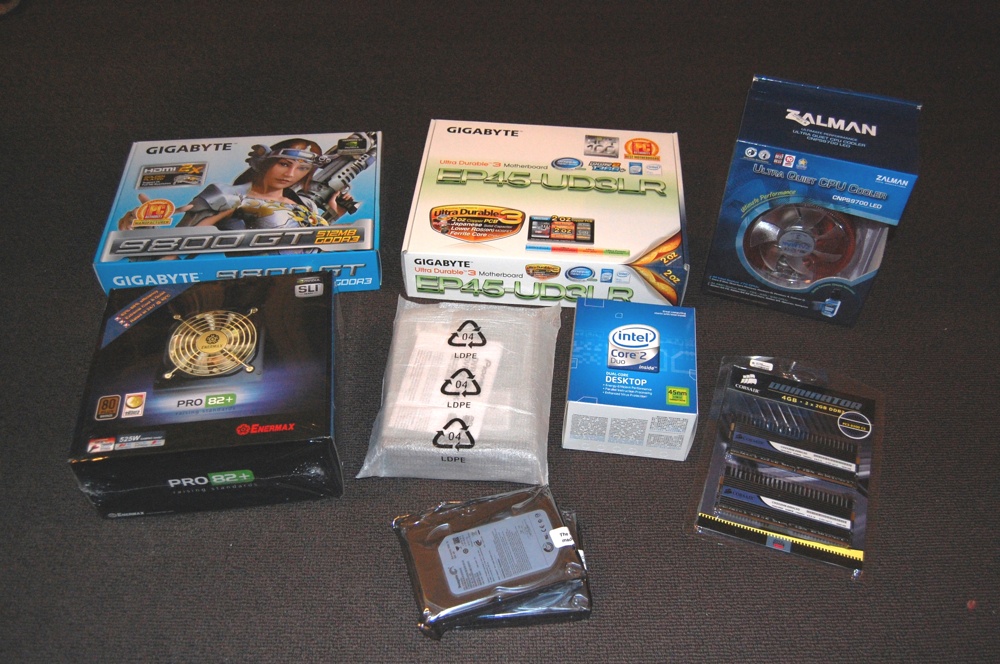
Picture 1: The delivery spread out on our floor, an evening's worth of work ahead of me.
3. The build
Putting the system together was pretty straight-forward. All connectors are labelled and coded these days, and the board had connectors for the two case fans. The only fiddly bit was the installation of the brace that fixes the cooler onto the CPU. The cooler weighs over 700g and has lots of sharp fins, which resulted in a couple of cuts on my fingers. Ouch.
It was slightly annoying that the motherboard came with only two SATA cables when I would have needed three for the optical drive and the two disks. Selecting the boot drive by plugging in the corresponding hard drive is probably the easiest dual boot option, but it isn't what I had in mind.
The default BIOS settings were almost all good, I only made two changes at this stage. By default the BIOS had set the CPU multiplier to 8, resulting in a CPU frequency of 2.66GHz. To get the correct 3GHz I simply set the multiplier to 9. I guess you could go to 10, slightly overclocking the CPU, but I haven't tried this yet. I also noticed that the CPU fan was spinning at full speed. This was less obvious to fix but it turns out that the one I used does not support PWM speed control, which is the default. Luckily the board offers a Voltage option for CPU Smart Fan Mode.
One of the goals of this build was to create a relatively silent system, and with a tamed CPU fan it only produces a low whisper. It is definitely more silent than my Power Mac G5, but to be fair that was much more quite when it was new 4.5 years ago.

Picture 2: Assembled system. Somehow I didn't achieve that clean and tidy look of the Apple towers.
4. The install
With only one hard drive and the DVD connected I went for a plain Snow Leopard install following this guide on lifehacker. Since then, a newer guide describing an even more streamlined version of the install has appeared.
The BIOS settings section in the guide is invaluable but it took me a while to realise that the boot order of the hard drives (the USB stick counts as one) can only be modified with the plus and minus keys on the numerical keypad; the keys on the main keyboard simply don't work. Also, it is definitely not sufficient to have USB-HDD as first boot device, the stick must be first in the hard drive list as on this picture.
With everything in place, the installation went smoothly and the system worked right away, including on-board ethernet, sleep, and power off. In fact, turning the computer off from the menu was so fast, maybe due to optimisations in Snow Leopard, that I first thought it had crashed.
As expected the on-board sound didn't work because the board from the guide uses a different sound chip. I didn't bother to look into this because I intend to use my Sound Sticks and iMic adaptor, both of which are USB-based and work without additional drivers.
5. Dual-booting Snow Leopard and Windows 7
Still with only one hard drive connected but with some unexpected time on my hands I became ambitious and decided to get dual-booting to work off one hard drive. I used the final retail version of Windows 7, which I had access to through my work MSDN subscription.
The process involved a fair amount of trial and error, especially because the Windows 7 repair functionality, which is meant to be able to restore the boot loader, seems completely broken. The tool actually complained that it could not fix this version of Windows, despite it coming off the same DVD. Ah, well.
In the end, one sequence led to success: first, I booted into the Snow Leopard installer and partitioned the hard drive, leaving a large first partition formatted as FAT32 for a later Windows install. Then I proceeded with the install and also followed the steps to make the system boot Snow Leopard off the hard drive without the USB stick. Next, I installed Windows 7 from its DVD onto the first partition, which it obviously converted to NTFS. After that I used EasyBCD to add the existing and bootable OS X partition to the Windows boot loader; and of course I made OS X the default choice.
By the way, during the Windows install I did get somewhat confused by the long-ish hardware detection phase, thinking the installer was hanging, but apparently this is normal. I also got caught out by leaving the USB stick with the Snow Leopard installer plugged in, which really confused the Windows installer.
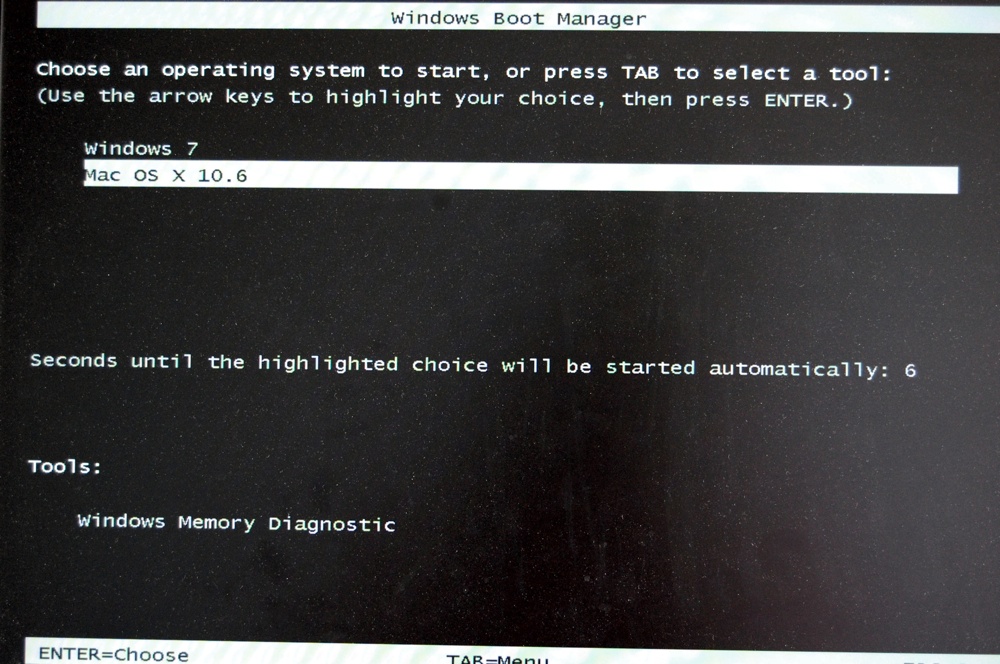
Picture 3: OS Selector. It's the Windows one but I don't care because it works.
6. Post-install Snow Leopard tuning
Looking around the system I noticed a few things I wasn't completely happy with:
- Memory speed was reported as 800MHz and not 1066MHz as it should.
- QuartzExtreme was neither shown as supported nor as unsupported.
- System log files contained entries complaining that the system UUID could not be found.
- Bonjour discovery of other Macs on the LAN did not work.
- Tools such as Hardware Monitor could not read sensors other than the HDD temperature.
EFI Strings and DSDT
For the first two issues I spent a while learning about EFI Strings and DSDT. I suspected that issues 4 and possibly even 5 could be addressed this way, too.
Differentiated System Description Table (DSDT) is a way for the BIOS to describe the hardware to an operating system. Unfortunately, or maybe intentionally
, most PC boards cannot provide sufficient information for OS X, which is why Chameleon provides this information from theDSDT.aml file. As far as I understand it would be possible to write a patched DSDT into the BIOS but why risk it when Chameleon's boot loader can do this via software?
To manipulate the DSDT file it must be decompiled to the corresponding source code. There are several different compilers but I used the one that came with Fassl's DSDT Patcher. The actual command to decompile the .aml file is:
iasl -d DSDT.aml
Once changes are made, and I'll come back to what those changes are, the .dsl source can be compiled to a .aml file again, using the same compiler.
isdl -ta DSDT.dsl
EFI Strings are a different method for providing information about the hardware to OS X. They are slightly easier to edit but they cannot provide all the information required by Snow Leopard, which means a DSDT file would be needed even if some information was provided via EFI strings. For this reason I decided to stick with just the DSDT.
Quartz Extreme
Having never seen a running Snow Leopard system I was confused by the fact that System Profiler didn't show a QuartzExtreme (QE) entry. Most of the epic threads about enabling QE mention that the profiler explicitly says “QuartzExtreme: not supported.” After spending a couple of hours trying all sorts of DSDT entries and EFI Strings to get QE working I gave up and went back to the forums.
The somewhat surprising answer was that QE had been working all along. Snow Leopard simply does not show the QE status in System Profiler because all Macs (produced by Apple) that can run Snow Leopard support QE. The easiest way to confirm that QE is indeed working is to add a new widget to the dashboard; if that shows a ripple effect then QE is working.
RAM speed and other System Profiler information
It turns out that there is yet another source for system information, provided by Chameleon through the smbios.plist file, and it was this file that OS X got the RAM speed from. After adding a few entries System Profiler now shows the correct information. As far as I can tell this is just cosmetic, though, and if I wanted I could make System Profiler show that I have some amazing 3GHz memory.
System UUID
Reading up on this problem made me realise that it is not a cosmetic issue and it would prevent me from using Time Machine once I have that extra SATA cable. The cause for the problem is that OS X uses the ethernet address of a built-in network adaptor as part of the UUID but for some reason the network adaptors in most Hackintoshes are not considered built-in by OS X. So, no built-in network, no UUID. I suspect it might be possible to fix this via the DSDT but as far as I can tell nobody has figured out how to do it yet. Setting the value for build-in in the LAN section to 0x01 certainly did not do the trick. And, yes, it looks like the key needs do be “build-in” with a d.
Other options are to add a fake network device, which I didn't like because it requires changes to system files outside the Extra folder, or a custom kernel extension; Superhai's PlaformUUID.kext seemed the preferred one.
Now I was running into problems, though, because the Extra package from the Lifehacker guide only came with a cached version of the kernel extensions, all bunched up in a single .mkext file, leaving no easy way to add another one. It is possible, though, to get architecture specific versions of the individual extensions back from the cache file using the kextcache command. The two graphical front-ends mentioned in some forums did not work for me by the way, maybe due to the changes in Snow Leopard.
With the individual kernel extensions it would have been possible to add the UUID extension but at this stage I had also realised, with my growing but still quite minimal knowledge of DSDT, that it probably wasn't the best long term strategy to use a DSDT written for a different board and BIOS. Sure, they were similar enough to allow me to boot my Hackintosh, but sorting out these little kinks required a bit more precision. Luckily, new guides had appeared in the meantime. See just below.
DSDT - Take 2
To fix my remaining problems, I looked at the new GA-EP45-DS3L Guide. This guide not only provided a better matching DSDT but it also answered a question about DSDT I'd had for a while, namely how to get a DSDT file for my system.
The DSDT patcher mentioned above has an option to create a DSDT for the running system but it will inevitably see the information provided by Chameleon from the existing DSDT.aml file. So, one option to get a fresh file would be to run without a Chameleon provided DSDT but without that the system wouldn't boot. Chicken and Egg... The solution lies in Koalala's DSDT Patcher. This tool can create a DSDT based on a BIOS file downloaded from the board manufacturer's website.
Starting with a base DSDT created this way I followed the “DSDT Guide for GA-EP45-DS3L” linked from this post; I'm referring to the PDF document. It's quite comprehensive and includes a few tricks I've not seen elsewhere, e.g. a way to configure SATA so that IOAHCIBlockStorageInjector.kext is not needed.
At this stage I was still interested in fixing my System UUID problem. With the corresponding kernel extension included my UUID problem was gone, and, almost accidentally, the on-board sound was supported. (I used the “2-in 4-out” LegacyHDA kernel extension.) There is still an issue with the front-panel microphone input not working but given that I'm using a USB-based system I didn't look into this further.
Bonjour
The new guide also included a script to fix the Bonjour issue. It didn't work out-of-the box for me but it was simple and easy to understand. In a nutshell, the ethernet interface must be put into promiscuous mode, and because the version of ifconfig that ships with Snow Leopard does not support this the guide pack came with a custom built version. I've now added the following script as a login hook.
#!/bin/sh
/Extra/Bonjour/ifconfig en0 promisc
Details are described in this guide.
The 64bit kernel
While the better matching DSDT and new kernel extensions fixed my problems, they introduced sporadic kernel panics. After some investigation I realised that I was now booting the 64bit kernel. The “fix” consisted of adding arch=i386 to the kernel flags in come.apple.Boot.plist. In fact, the guide's version had this flag, I must have forgotten to copy it over.
Back with the 32bit kernel my Hackintosh was as stable as before. I guess it would have been nice had it been stable with the 64bit kernel but it wasn't important enough to me to look into further.
Hardware monitoring
With a Snow Leopard compatible version Hardware Monitor only finds few sensors. In fact, on my system it can only see the hard disk's temperature and a usage percentage for the graphics processor. With its own kernel extension it can also see the CPU core temperatures. Maybe, maybe some more DSDT fiddling would make more sensors available, fan speed for example is available under Windows, but at this stage I only wanted to keep an eye on the CPUs anyway.
Tuning summary
There is an incredible amount of information available on the forums, especially the InsanelyMac one, but a lot of it is contradictory, or guess-work, or outdated. It took me while to find the information needed but in the end, using a correct DSDT and smbios, I managed to get a fully functioning system with only the following kernel extensions in Chameleon's Extra folder:
- OpenHaltRestart (com.psystar.driver.OpenHaltRestart)
- fakesmc (org.netkas.fakesmc)
- LegacyHDA (org.world.driver.LegacyHDA)
- PlatformUUID (com.superhai.driver.PlatformUUID)
There is no need to patch the OS X install, no need for EFI strings, and the special GUI tools sometimes recommended are also not required any longer.

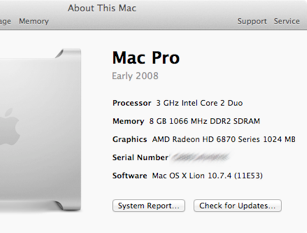
Picture 4: Some screens from System Profiler showing graphics card, audio, SATA, and built-in USB bus. The Southbridge is not listed as ICH10 even though that is what is on the board because I'm leading OS X to believe it's an ESB2 to work around the "orange disk" problem.
7. Mac OS X Updates
I am using the configuration described above with a 32bit kernel. The 64bit kernel will definitely cause sporadic panics in this configuration with 10.6.0 and 10.6.1.
10.6.1: Updated from Software Update. No problems; sleep, restart, Time Machine, on-board networking, and on-board sound confirmed to work.
10.6.2: Updated from Software Update. No problems; sleep, restart, Time Machine, and on-board networking confirmed to work. Did not retest on-board sound as I'm using a USB sound device.
10.6.3: In the meantime, I upgraded to a newer version of PC EFI and I began using a DSDT based on this article. With that I updated from Software Update. No problems; sleep, restart, Time Machine, and on-board networking confirmed to work. Sound is not working because Apple removed support for this chipset from their driver.
10.6.4 - 10.6.8: Updated from Software Update. No problems. I have switched to the 64bit kernel now, with the changes described under the 10.6.3 update it is rock solid.

10.7 aka OS X Lion: I did a clean install for Lion using tseug's guide only keeping my existing DSDT. I copied the Fake SMC kext into the System/Library/Extensions folder to use the new caching mechanism without hassle.
10.7.1: Updated from Software Update. No problems.
10.7.2: Updated from Software Update. Did not detect my graphics card (NVIDIA 9800GT) any longer. Removing the GPU section from the DSDT fixed this because graphics enabler automatically sets better strings, i.e. strings that are accepted by the newer drivers.
10.7.3 - 10.7.4: Updated from Software Update. No problems. Switched to a new grahics card (Radeon HD6870), which worked out of the box after the changes I made for 10.7.2.
8. The next Hackintosh
Three years after building this Hackintosh I think it is fair to say that it was a resounding success. I enjoyed building and tuning it, and in every day use it was a fast Mac that just worked. Not to forget that it doubled as a very capable Windows computer for gaming and .NET development.
With this positive experience, in August 2012, with Mountain Lion and Ivy Bridge just out, I decded to build my next Hackintosh. Read the tech note.
If you want to discuss this article, please use our forums.